Introduction to Typescript for React developers
Learn how to start working with typescript
🚀 CTO & Co-founder at Techfinity Studio — AI-driven software studio 👨💻 Full-stack developer, technical leader For the past 11 years, I’ve been building modern software solutions — today as the CTO and co-founder of Techfinity Studio, where we help companies build smart, efficient, and secure digital products. We use the right mix of technologies — from custom software to AI-driven solutions and low-code platforms — to deliver real business value. 💡 Key areas of expertise: • TypeScript, React, Next.js, Node.js, NestJS • AI integration & AI-driven apps • Security-first architecture • Functional Programming I’m passionate about building great software and helping organizations navigate the rapidly evolving tech landscape. Outside of work, I enjoy ♟️ playing chess and exploring the intersection of technology and creativity. 🌍 I work in an international environment. Languages: 🇵🇱 Polish (native) 🇬🇧 English (fluent) 🇪🇸 Spanish (fluent) 🇵🇹 Portuguese (good) 🇧🇬 Bulgarian (communicative) 🤝 If you’d like to connect to discuss: • building modern digital products • applying AI where it makes sense • designing secure and scalable architecture • or simply exchange ideas on technology Feel free to reach out!
During the last few years, Typescript has been taking the market by storm. More and more frontend developers begin to appreciate the benefits of using a strongly typed language.
However, there are still many developers who aren't fully on board with it. Some say that it adds more complexity to the build system. Others are not so fond of the types themselves - they feel that having to add type annotations would make it harder for them to code. Others argue that it's hard to work in Typescript with so many libraries still missing type definitions. While sometimes those arguments are valid, there are so much more benefits in using Typescript than the downsides.
I, personally, have been using Typescript in all my recent projects. Allow me to be your guide into the fascinating world of Typescript.
A superset of Javascript
If you are a beginner, it may look daunting to learn "a whole new language". Well, I have some good news for you. If you know Javascript, you will be able to quickly start writing some code. It's because Typescript is a superset of Javascript. It means that any valid Javascript code is a valid Typescript code.
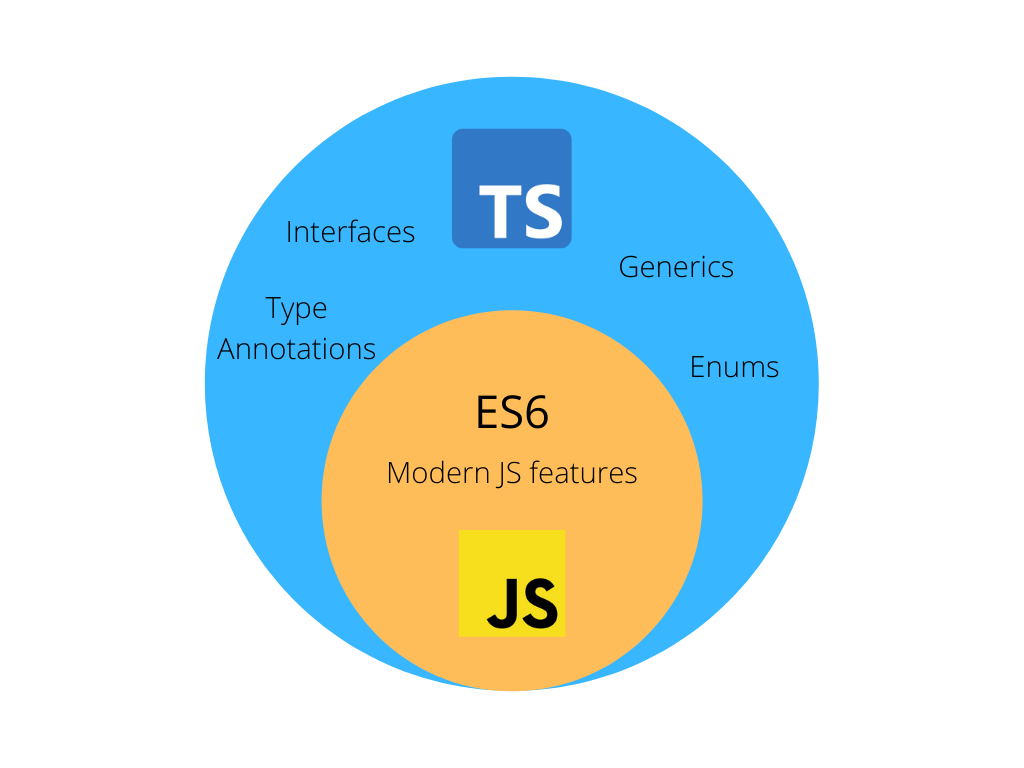
Typescript has some additions, that you'll have to learn as you go, but the good news is that you can start writing your code right away in Typescript - without having to learn the fundamentals again.
Easy to set up with modern tools
Another concern is that Typescript will elevate the complexity of the build process. While it's true that Typescript usually requires some additional rules in the build pipeline, many modern tools like create-react-app or (my favourite) create-next-app already have Typescript templates that will set everything up for you.
To create a new Typescript react app just run this command:
npx create-react-app my-awesome-typescript-app --template typescript
Similarly to create a new NextJS app with typescript simply run:
npx create-next-app@latest --ts
I think that it's worth mentioning the Parcel bundler - an alternative to Webpack, which does not require any configuration to run Typescript code. It just works out of the box.
Type annotations
To specify the type of a variable in Typescript we are using a colon sign (:).
To give you some examples (out of React) let's take a look at the following snippet:
const firstName: string = 'John'
const age: number = 34
const hasChildren: boolean = false
As you see, the notation that Typescript uses is very easy to read. We know right away what type of value a variable contains.
If we violate the rules that we set for a specific variable, it will fail in the build time. It won't even compile until you fix this issue.
let age: number = 34

age = 'old' // Type 'string' is not assignable to type 'number'. ts(2322)
This example is so trivial, that it may never actually happen in the real world. But imagine that you have more complex logic, and making such a mistake can crash your app.
Unless you use Typescript. In this case, you will see a nice error from the compiler, and your clients won't see a blank page.
Usage in React
Let's take a look at how to use Typescript with react components. Let's say that we have the following component written in Javascript:
// Header.js

const Header = () => {
  return (
    <div className="card">
      <h1>Look at my awesome Typescript component</h1>
    </div>
  );
}

export default Header
Firstly, you'll need to change the extension of your file from .js to .tsx.
The next step would be adding a type definition to the component. React has all the necessary definitions included in its source code.
We'll use a definition for a FunctionComponent:
// Header.tsx

const Header: React.FunctionComponent = () => {
  return (
    <div className="card">
      <h1>Look at my awesome Typescript component</h1>
    </div>
  );
}

export default Header
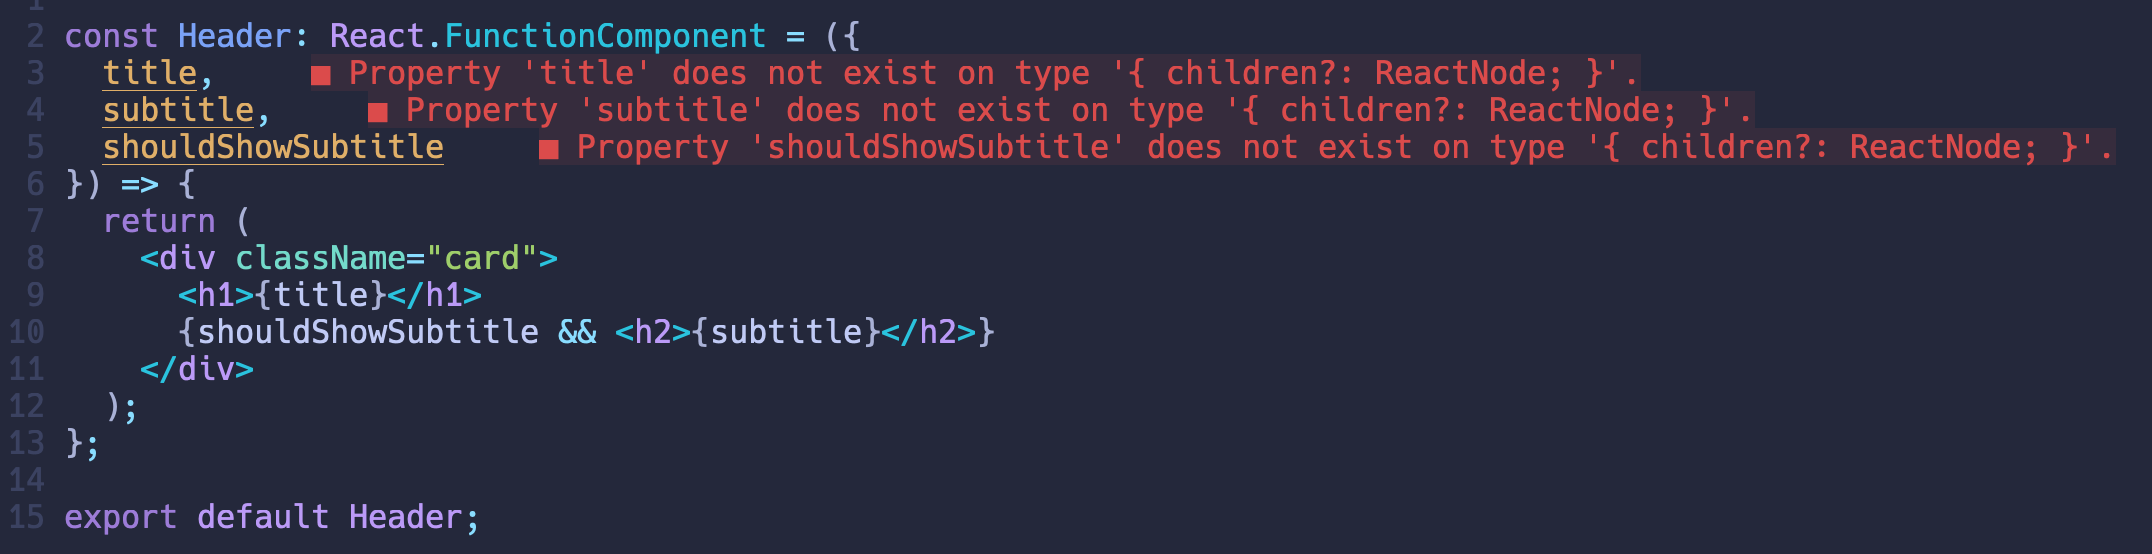
Now, let's add some props to the component:
// Header.tsx

const Header: React.FunctionComponent = ({
  title,
  subtitle,
  shouldShowSubtitle
}) => {
  return (
    <div className="card">
      <h1>{title}</h1>
      {shouldShowSubtitle && <h2>{subtitle}</h2>}
    </div>
  );
};

export default Header;
After adding those props you will probably see a red line underneath all of them. That's Typescript telling you that it doesn't know what are the types of those props.
To fix it, let's add an interface.
Interfaces
Interfaces are another addition to Typescript. They allow us to specify a structure of an object, and the types for its fields.
Let's create an interface for those props.
interface HeaderProps {
  title: string
  subtitle: string
  shouldShowSubtitle: boolean
}
Here we simply say that the props object should contain a title, subtitle and shouldShowSubtitle fields, and each of them has a defined type.
To assign this interface to our component we must change its type annotation.
interface HeaderProps {
  title: string
  subtitle: string
  shouldShowSubtitle: boolean
}

const Header: React.FunctionComponent<HeaderProps> = ({
// ...
In the interfaces, we can set fields as optional as well. Let's say that we have a default value for the shouldShowSubtitle prop.
We simply need to add a question mark ? after the prop name.
The complete code for this component may look like this:
interface HeaderProps {
  title: string
  subtitle: string
  shouldShowSubtitle?: boolean
}

const Header: React.FunctionComponent<HeaderProps> = ({
  title,
  subtitle,
  shouldShowSubtitle = false
}) => {
  return (
    <div className="card">
      <h1>{title}</h1>
      {shouldShowSubtitle && <h2>{subtitle}</h2>}
    </div>
  );
};

export default Header;
Typing hooks
So far we have learnt how to type components that are created by us. But what should we do with the built-in hooks?
Let's say that we have the following hooks in our component:
const [age, setAge] = useState(0)
const [name, setName] = useState('')

const ref = useRef(null)
Typescript introduces concept of Generics. It's widely used in other strongly typed languages as well.
In a nutshell, it allows us to pass a type parameter to the function (or a hook in this example). This can be done as follows:
const [age, setAge] = useState<number>(0)
const [name, setName] = useState<string>('')

const ref = useRef<HTMLDivElement | null>(null)
It means that the age variable is a number and the setAge function takes a number as a parameter as well.
The same goes for name and setName but this time we are dealing with string.
In the last example, we are assigning the HTMLDivElement | null type to the useRef hook.
This kind of type is called Union Type.
It means that it will be either HTMLDivElement or a null.
Conclusion
Let's wrap things up here. There is so much more to say about this awesome tool. What we covered in this post is just scratching the surface, but should be enough for you to start your journey with Typescript.
I hope to explore more of it in future posts on this blog. If you'd like to read them too, you can subscribe to my newsletter, so that you don't miss my next posts.
Thank you for spending this time with me, and I hope you have a great day!